Friday, November 29, 2019

Subscribe to Change Events Using an Apex Trigger

Asynchronous Apex Triggers for Change Events 

You can subscribe to change events on the Lightning Platform using Apex triggers. The change event trigger fires when one or a batch of change events is received. Unlike object triggers, change event triggers run asynchronously after the database transaction is completed. The  asynchronous execution makes change event triggers ideal for processing resource-intensive business logic while keeping transaction-based logic in the object trigger. By decoupling the processing of changes, change event triggers can help reduce transaction processing time.
Define a change event trigger with the after insert keyword on the change event using this format.
trigger TriggerName on ChangeEventName (after insert) {
}
ChangeEventName is the name of the change event, such as AccountChangeEvent, or for the employee custom object, Employee__ChangeEvent.
Change event triggers share these characteristics with platform event triggers.
  • They run under the Automated Process entity. As such, debug logs for the trigger are created by the Automated Process entity, and system fields, such as CreatedById and OwnerId, reference Automated Process.
  • They are subject to Apex synchronous governor limits.
  • They have a maximum batch size of 2,000 event messages (the number of items in Trigger.New).

Apex Change Event Record and Header Fields

Because fields in a change event message are statically defined, just like in any other Apex type, all record fields are present. Unlike change events received in external CometD apps, Apex change event messages can contain empty (null) fields. Unchanged fields are null, and so are fields that are explicitly set to null in an update. 
To figure out which fields were modified, use the changedFields header field. It contains a list of record fields that were changed in an update operation.
Note

Note

The changedFields header field is available for Apex change event triggers saved using API version 47.0 or later.

Create a Change Event Trigger

Adding a change event trigger is as straightforward as adding a trigger for a Salesforce object. You create a trigger on the change event associated with the Employee custom object that you created previously using the Developer Console. The system creates the change event object, Employee__ChangeEvent, when you create a custom object. 
  1. To open the Developer Console:
    1. Click the quick access menu ( Quick access menu).
    2. Click Developer Console.
  2. In the Developer Console, select File | New | Apex Trigger.
  3. In the Name field, enter a name for the trigger: EmployeeChangeTrigger.
  4. From the dropdown, select the change event object for the Employee custom object: Employee__ChangeEvent. The trigger is created with the after insert keyword.
  5. Replace the default content with the following code.
trigger EmployeeChangeTrigger on Employee__ChangeEvent (after insert) {
  List<Task> tasks = new List<Task>();
  
  // Iterate through each event message.
  for (Employee__ChangeEvent event : Trigger.New) {
    // Get some event header fields
    EventBus.ChangeEventHeader header = event.ChangeEventHeader;
    System.debug('Received change event for ' +
      header.entityName +
      ' for the ' + header.changeType + ' operation.');
    // For update operations, we can get a list of changed fields
    if (header.changetype == 'UPDATE') {
        System.debug('List of all changed fields:');
        for (String field : header.changedFields) {
            if (null == event.get(field)) {
                System.debug('Deleted field value (set to null): ' + field);
            } else {
                System.debug('Changed field value: ' + field + '. New Value: '
                    + event.get(field));
            }
        }
    }
    // Get record fields and display only if not null.
    System.debug('Some Employee record field values from the change event:');
    if (event.First_Name__c != null) {
      System.debug('First Name: ' + event.First_Name__c);
    }
    if (event.Last_Name__c != null) {
      System.debug('Last Name: ' + event.Last_Name__c);
    }
    if (event.Name != null) {
      System.debug('Name: ' + event.Name);
    }
    if (event.Tenure__c != null) {
      System.debug('Tenure: ' + event.Tenure__c);
    }
    // Create a followup task
    Task tk = new Task();
    tk.Subject = 'Follow up on employee record(s): ' +
    header.recordIds;
    tk.OwnerId = header.CommitUser;
    tasks.add(tk);
  }
  // Insert all tasks in bulk.
  if (tasks.size() > 0) {
    insert tasks;
  }
}
This change event trigger iterates through each received change event message in Trigger.New. For each event, the trigger gets a few header fields. If the operation is an update, the trigger also gets the list of fields that were changed by accessing the changedFields header value. Next, the trigger displays record field values if not null. Finally, it  creates a follow-up task for new Employee records.
Note

Note

From the user interface, you can create change event triggers from the Developer Console only. Change event objects aren't listed in Object Manager in Lightning Experience, or in Setup in Salesforce Classic. 

Verify Change Event Trigger Execution

Now let’s verify manually that the trigger is working. To receive event messages in the trigger, enable the object first on the Change Data Capture page in Setup. In a previous step, you already enabled notifications for Employee, so you can skip that step here. Because debug logs are created under the Automated Process entity, enable debug logs in Setup for this entity for logs to be collected.
  1. To open Setup in a new tab, click the quick access menu ( Quick access menu), then click Setup.
  2. From Setup, enter Debug Logs in the Quick Find box, then select Debug Logs.
  3. Click New.
  4. For Traced Entity Type, select Automated Process.
  5. Select the time period to collect logs for and the debug level.
  6. Click Save.
Leave the Debug Logs Setup page open, since you’ll come back to it in a minute. Next, make some changes in Salesforce to fire the change event trigger. Create an Employee record and then update it.
  1. In a new tab, click the App Launcher ( App Launcher), then click Employees.
  2. Click New.
  3. Populate the following fields.
    • Employee Name: e-200
    • Last Name: Smith
    • First Name: Joseph
    • Tenure: 1
  4. Click Save.
  5. In the employee record detail page, click Edit.
  6. Change the First Name field to Joe.
  7. Delete the value for Tenure.
  8. Click Save.
  9. Switch to the Debug Logs tab and refresh the browser.
  10. To view the debug logs corresponding to the record creation, click View next to the second log in the list (logs are ordered by most recent first). The output of the System.debug statements looks similar to the following.
...|DEBUG|Received change event for Employee__c for the CREATE operation.
...|DEBUG|Some Employee record field values from the change event:
...|DEBUG|First Name: Joseph
...|DEBUG|Last Name: Smith
...|DEBUG|Name: e-200
...|DEBUG|Tenure: 1.0
  1. To view the debug logs corresponding to the record update, click View next to the first log in the list. The output of the System.debug statements looks similar to the following. Because the system updates the LastModifiedDate field when the record is updated, this field is listed as part of the changed fields.
...|DEBUG|Received change event for Employee__c for the UPDATE operation.
...|DEBUG|List of all changed fields:
...|DEBUG|Changed field value: LastModifiedDate. New Value: 2019-09-26 20:53:29
...|DEBUG|Changed field value: First_Name__c. New Value: Matt
...|DEBUG|Deleted field value (set to null): Tenure__c
...|DEBUG|Some Employee record field values from the change event:
...|DEBUG|First Name: Matt

Testing the Change Event Trigger

Before you can package or deploy Apex change event triggers to production, you must provide Apex tests and sufficient code coverage. 
To ensure that Salesforce record changes in a test method fire change event triggers, enable all entities for Change Data Capture by calling Test.enableChangeDataCapture() at the beginning of the test. This method enables all entities only for the test and doesn't affect the Change Data Capture entity selections for the org.
Test.enableChangeDataCapture();
After enabling Change Data Capture, perform some DML operations and then call the Test.getEventBus().deliver() method. The method delivers the event messages from the test event bus to the corresponding change event trigger and causes the trigger to fire.
Test.getEventBus().deliver();

Create and Run a Test for the Trigger

The test method in the class creates an Employee test record and updates the record. Each of these operations fires the trigger on the Employee change event. The test ensures the trigger execution by querying the task created and verifying the count of tasks.
When running the test class in the Developer Console, the debug logs are available in the Logs tab. For Apex tests, there is no need to set up debug logs in Setup for the Automated Process entity.
To create the test class:
  1. In the Developer Console, select File | New | Apex Class.
  2. In the Name field, enter a name for the trigger: TestEmployeeChangeTrigger.
  3. Replace the default content with the following code.
@isTest
public class TestEmployeeChangeTrigger {
  @isTest static void testCreateAndUpdateEmployee() {
    // Enable all Change Data Capture entities for notifications.
    Test.enableChangeDataCapture();
    // Insert an Employee test record
    insert new Employee__c(Name='e-101',
      First_Name__c='Astro',
      Last_Name__c='Test',
      Tenure__c=1);
    // Call deliver to fire the trigger and deliver the test change event.
    Test.getEventBus().deliver();
    // VERIFICATIONS
    // Check that the change event trigger created a task.
    Task[] taskList = [SELECT Id,Subject FROM Task];
    System.assertEquals(1, taskList.size(),
      'The change event trigger did not create the expected task.');
    // Update employee record
    Employee__c[] empRecords = [SELECT Id,OwnerId,First_Name__c,Tenure__c FROM Employee__c];
    // There is only one test record, so get the first one
    Employee__c emp = empRecords[0];
    // Debug
    System.debug('Retrieved employee record: ' + emp);
    // Update one field and empty another
    emp.First_Name__c = 'Codey';
    emp.Tenure__c = null;
    update emp;
    // Call deliver to fire the trigger for the update operation.
    Test.getEventBus().deliver();
    // VERIFICATIONS
    // Check that the change event trigger created a task.
    // We should have two tasks now, including one from the first trigger invocation.
    Task[] taskList2 = [SELECT Id,Subject FROM Task];
    System.assertEquals(2, taskList2.size(),
      'The change event trigger did not create the expected task.');
  }
}  
  1. Click Run Test. After the test finishes execution, the Tests tab shows the status of the test run.
  2. Click the Tests tab and expand the Overall Code Coverage pane. The code coverage for EmployeeChangeTrigger is at 100%, which is the result of running this test.

Monday, November 18, 2019

Salesforce Platform Events

While there are tons of documentation highlighting about platform events and their use cases there are even trailhead modules, recently we came up with the question that how should someone be able to tell a Salesforce rookie what a platform event is? Yes, it’s a platform-based notification system which can help orchestrate a proper integration routine but explaining this to someone who has just begun his/her coding is a bit harsh. So, what’s platform event in basic terms and how is it helpful to me?
Consider this, a platform event is just like another custom object but this would only be referred by external systems to communicate with Salesforce. To put this in a scenario when a certain system posts data on a Salesforce endpoint then that data should be fetched and the data in Salesforce should be updated. Of course, you can use too many lines of code to continuously fetch and retrieve the data from the endpoint or just wait for data to be posted based on which an event shall be triggered and the next processes shall follow. Now, this is where platform event comes into the picture, instead of writing lines and lines of codes and continuously requesting and checking if the data is posted we can just have a platform event trigger notify us and then have your logic do the rest of the heavy lifting.
Now, that we have convinced you why Platform events are good, let’s give you a quick walkthrough of it. From your Setup, in quick find box search for “Platform Events” then click on “New Platform Event” then just like your Custom Object enter the label and API name for your Platform Event. Once completed then add any Custom Fields you want. Now, for demo purpose we will be naming our platform event as “Demo Event” and we will be adding two fields to it named Account Number and Account Name.
Note- Platform event end with “__e” instead of “__c” notifying that they are platform event and differing from custom object.
Creating new Platform Event
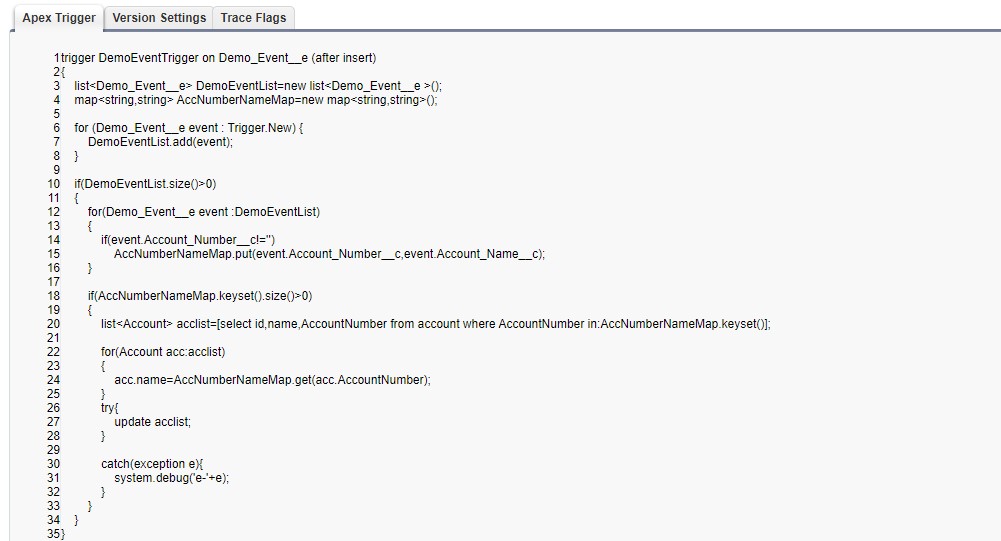
Once you are satisfied with you Platform Event and your fields click on “New” trigger for your platform event, then add the below code.
Platform Event Trigger
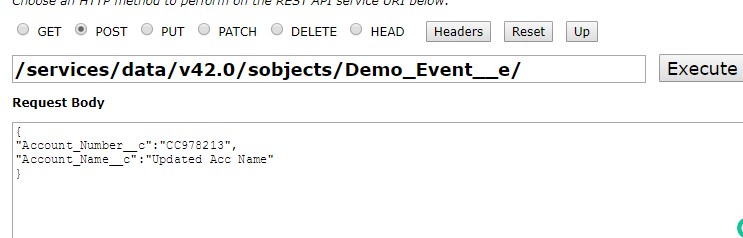
Now, log into Workbench then under Utilities section click on “Rest Explorer”, now, in your execute section after your version number just append “/sobjects//” e.g.-”/services/data/v42.0/sobjects/Demo_Event__e/” and in request body just add the below JSON and click on execute, once the request is processed your record will be updated.
Demo Request
Demo Request
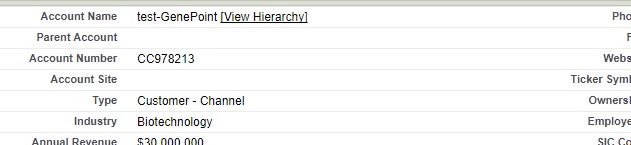
Account Name before processing the request
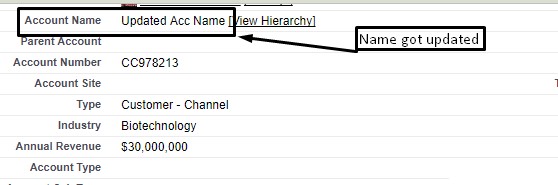
Updated Account Name after processing the request

Thursday, July 18, 2019

How to use salesforce REST API to fetch the data using encrypted field in filter Criteria

According to Salesforce doc: https://help.salesforce.com/articleView?id=security_pe_considerations_general.htm&type=5 (https://help.salesforce.com/articleView?id=security_pe_considerations_general.htm&type=5)

Encrypted fields that use the probabilistic encryption scheme can’t be used with the following SOQL and SOSL clauses and functions:
  • Aggregate functions such as MAX(), MIN(), and COUNT_DISTINCT()
  • WHERE clause
  • GROUP BY clause
  • ORDER BY clause

Consider whether you can replace a WHERE clause in a SOQL query with a FIND query in SOSL.

One of the most common problems encountered is the restriction around including encrypted fields in the where clause of a SOQL statement. A SOSL find statement can sometimes be used in lieu of a SOQL statement.

Implementation:

@RestResource(urlMapping='/GetOpportunityFromClientNumber/*')
global with sharing class WebServiceToGetOpportunity {
    /*********************************************************************************
    * @description  use this method to get the Opportunity Id and Opportunity owner id using client number
    * @return       OpportunityWrapper
    *********************************************************************************/
    @HttpGet
    global static void opportunityDetailFromCLientNumber() {
        String strURL = RestContext.request.requestURI;
        String[] strURLSplit = strURL.Split('/');
        // grab the client number the request      
        String clientNumber = strURLSplit[strURLSplit.size()-1];
        OpportunityWrapper oppWrap;
        List<Opportunity> lstOppRecord;
        try {
            //SOSL to retrieve the Account Id on the basis of client number
            List<List<SObject>> lstSobject = [FIND :clientNumber IN ALL FIELDS Returning Account (Id,Client_Number__c)];
            if(lstSobject != null && !lstSobject[0].isEmpty()){
                List<Account> searchAccounts = (List<Account>)lstSobject[0];
                //SOQL to fetch the associated opportunities with the Account Id
                lstOppRecord =  [SELECT Id,Account.Client_Number__c,OwnerId
                                 FROM Opportunity
                                 WHERE AccountId=:searchAccounts[0].Id AND IsWon=false AND LastModifiedDate >= LAST_N_MONTHS:2
                                 ORDER BY CreatedDate DESC LIMIT 1];
             
                if(!lstOppRecord.isEmpty() && lstOppRecord != null){
                    //fill the wrapper with Opportunity Id and Opportunity owner corporate key
                    oppWrap = new OpportunityWrapper(lstOppRecord[0].Id,lstOppRecord[0].OwnerId);
                    RestContext.response.responseBody = Blob.valueOf(oppWrap);
                }else{
                    //Exception when No Opportunity exist with Client Number in Salesforce'
                    createExceptionResponse(404,'NOT_FOUND','No Opportunity exist with Client Number '+clientNumber+' in Salesforce');
                }
            }else{
                //Exception when Client Number not exist in Salesforce'
                createExceptionResponse(404,'NOT_FOUND','Client Number '+clientNumber+' not exist in Salesforce');
            }       
        }catch(Exception e){ createExceptionResponse(500,'BAD_REQUEST',e.getMessage());} //something else happened                             
    }
 
    /*********************************************************************************
    * @description  use this method to create the RestContext Exception
    *********************************************************************************/
    global static void createExceptionResponse(Integer sfStatusCode,String sf_ErrorCode,String sf_Message){
        RestContext.response.statusCode = sfStatusCode;
        SalesforceError[] errs = new SalesforceError[]{ new SalesforceError(sf_ErrorCode, sf_Message)};
            RestContext.response.responseBody = Blob.valueOf(JSON.serialize(errs));
        system.debug('RestContext'+JSON.serialize(errs)); 
    }
 
    /*********************************************************************************
    * @description  use this class to serilize opportunity id and OwnerId
    *********************************************************************************/
    global class OpportunityWrapper{
        public String sf_OpportunityId;
        public String sf_OpportunityOwnerId;
     
        public OpportunityWrapper(String sf_OpportunityId,String sf_OpportunityOwnerId){
            this.sf_OpportunityId=sf_OpportunityId;
            this.sf_OpportunityOwnerId=sf_OpportunityOwnerId; 
        }
    } 
    /*********************************************************************************
    * @description  use this class to serilize the salesforce error response structure
    *********************************************************************************/ 
    global class SalesforceError {
        public String errorCode;
        public String message;
        public SalesforceError(String errorCode, string message){
            this.errorCode = errorCode;
            this.message = message;
        }
    }
}

Output:

Tuesday, May 28, 2019

Useful commands for SFDX in Visual Studio Code


  1. To pull changed source from the scratch org to the project: 
    • sfdx force:source:pull
  2. To pull source to the project if a conflict has been detected: 
    • sfdx force:source:pull --forceoverwrite
  3. To push changed source to a scratch org that’s not the default, you can indicate it by its username or alias:
    • sfdx force:source:push --targetusername test-b4agup43oxmu@example.com
    • sfdx force:source:push -u test-b4agup43oxmu@example.com
    • sfdx force:source:push -u MyGroovyScratchOrg

sfdx force:mdapi:retrieve giving “UNSUPPORTED_API_VERSION: Invalid Api version specified on URL.”

In CLI terminal, sfdx force --version and sfdx plugins revealed to me that even if my VSCode extensions are v44, and my CLI version is sfdx-cli/6.44.0-dead729fb5 (windows-x64) node-v8.9.4... well, apparently sfdx itself (which I thought was an abstraction) has a version #, and it was 45.
Solution is to manually override the API version used by your project
After moving into a project folder, specify a version override with the following command:
sfdx force:config:set apiVersion=44.0 This will allow you to use the newer 45.0 features in a LWC project, whilst still being able to work in a 44.0 org without any errors.
Make sure that, if you're playing with an advanced version of the API, that you keep the salesforcedx@pre-release plugin installed until it is upgraded to the latest release.

Setup Visual Studio Code(VSC) for Salesforce Development without Scratch Org

This is a step to step guide to setup Visual Studio Code for salesforce development without using Dev-Hub and Scratch Orgs, you can now use vs code for your Dev Org and Sandboxes just like any other IDE, also this will allow you to push your manifest at many org at once and even sync it with your Code Repository.


1. Install Salesforce CLI from this link https://developer.salesforce.com/tools/sfdxcli, if already installed make sure you have the latest version.
2. Download and Install Salesforce VsCode from here https://code.visualstudio.com/, if already installed make sure you have the latest version.
3. Install “Salesforce Extension Pack” from Extensions Marketplace in VS Code.

4. In the Terminal window, run the following command,
sfdx plugins:install salesforcedx@pre-release
If the terminal is not visible on UI then go to Menu->View->Terminal
5. Create a Project
  • Press “CTRL+SHIFT+P” then select  “SFDX: Create Project with Manifest“
VS Create Project with manfest
  • Then enter your Project Name and select a folder where you want to keep all your local copy of Manifest and ProjectFiles.
Enter project name
6. Authorize your Dev Org or Sandbox
  • Press “CTRL+SHIFT+P” then select  “SFDX: Authorize an Org“
Authorize Dev Org7. Select Org Type
Enter Org Type
After Successful login, you can close the browser and you can notice that few files and folder are now displayed in the left sidebar.
8. Retrieve Metadata
  • Now we will be retrieving all the necessary manifest to make changes, for that expand the manifest folder and open package.xml in the editor. (If you are working on fresh org you can skip this step)
  • Edit package XML to retrieve desired components from the authorized org.
  • After that right click on package.xml either in Explorer or in the Editor Window and click on SFDX: Retrieve Source in Manifest from Org
Retrieve Metadata
After the retrieval process is completed you can see your metadata in force-app folder in the explorer.
9. Deploy Metadata
  • After you are done with changes in your Metadata, just right click on that file and click on SFDX: Deploy This Source to Org, it will deploy your changes to Authorized org and remember that the source you deploy overwrites the corresponding metadata in your Org
Deploy Metadata
Good luck with the development in VS Code and say goodbye to other IDEs.
Some useful links:
1. Salesforce CLI Documentation

Wednesday, September 27, 2017

Overview of some of the most commonly used selectors

Below is a brief overview of some of the most commonly used selectors.

$("*") - Wildcard: selects every element on the page.
$(this) - Current: selects the current element being operated on within a function.
$("p") - Tag: selects every instance of the <p> tag.
$(".example") - Class: selects every element that has the example class applied to it.
$("#example") - Id: selects a single instance of the unique example id.
$("[type='text']") - Attribute: selects any element with text applied to the type attribute.
$("p:first-of-type") - Pseudo Element: selects the first <p>.

Tuesday, September 26, 2017

Search results always "Search All"


When you search all, you will see the records on the left hand side. Each record type has a little pin on the right hand side. If the user clicks that those objects will always be checked in the regular search. That way they should not need to click search all to find those records when searching.